 |
| In a hot climate, refrigeration and cold drinks are a top cruising comfort. |
Back in California, when we packed up Cinnabar for her trip south, I was appalled at the plethora of HEAVY tools and spare parts that Tom insisted on stuffing into the boat. Did we really NEED all these items?
 |
| A mess! Cinnabar the night before we leave California. Where are going to fit all this stuff? |
Over the
past few months I have definitely seen the sense in being as self-reliant as
possible when it comes to repairing and replacing broken bits. Replacement parts are difficult/expensive to obtain down here in Mexico, although they can fix
almost anything (may not be pretty). Kind of like how the U.S. used to be before we became a
disposable society where it is now cheaper to replace than to repair. But I
digress…
Yesterday we were relaxing over our morning tea, listening
to the local cruisers radio net and catching up on email, when our Glacier Bay Mark II refrigeration system
turned on as normal. But it sounded ABNORMAL. We always listen for anything
out of the ordinary on a boat because it is usually the first sign that
something is amiss. “What’s that noise?” I demanded, “Something doesn’t sound
right.” Tom ran to the back of the boat, noted that there was no cooling seawater output like there is supposed to be, and he immediately turned off the refer system. Shite! We had a
full refrigerator and a freezer packed with fresh fish and other meats. Were we
going to have to eat all of the food before it spoiled or would we be able to
make a repair? Would we have to suffer no ice and warm beer, old school style, for the remainder of our trip? This was a serious condition that needed immediate attention.
After some discussion about “what could it be”, our first
stab at troubleshooting revealed it was likely the 10 year old Johnson marine pump (Johnson CM30P7-1, 12V, 2 Amps, 6 gal/min), which
is a little circulation pump, mounted below the water level, that pumps raw seawater through
the system to remove heat from the coveted cold boxes.  |
| Johnson Pump - the offending part (center). Note seawater level marked with blue pen on Sea Chest to the upper right. |
As Tom started removing the old pump I began thinking of Plans B and C should this repair not fix the reefer. Let’s see, ice could keep stuff cold and semi-frozen for a few days until we fixed it here or got to La Paz…I could contact my old pal and reefer expert Jim A. from Glacier Bay and fly him down here to do the repair (plus it would be fun to see him again!)…but first things first, so we (i.e. TOM) attacked the repair.
 |
| Tom unscrews the pump bracket so he can access the pump. |
 |
| Loosening the hose clamps on the hoses. Note towel underneath to catch drips. |
After removing the input and output water hoses (easier said
than done, but isn't everything on a boat?) we put a flashlight to the inside of the pump and confirmed the
little vanes were not spinning, so it appeared the problem was the pump, which was
a good thing because we had a spare identical pump! Yay for Tom and Rich for having the spare and cataloguing it!
 |
| Replacement pump on left, broken pump on right. Looks like it will be a perfect fit! |
Removing the water hoses caused one end to split; this would result in a leak if not addressed. This hose was barely long enough and looked to be in rather poor/deteriorated condition...
 |
| Yuck! Looks old and hard. |
...but we decided that cutting 1” from the hose end should be OK.
 |
| We cut 1" off the hose to remove the section with the split/leak. |
After checking the new pump with Tom's homemade 12V test jig to make sure it would actually work...
 |
| Handy homemade 12V tester (High quality fused cig lighter plug w/LED power light, 2-line cord, alligator clips) |
...Tom cut the electrical lines on the old pump.
We Bullfrogged (anti-corrosion cream, brushed on) the new pump because, in Tom’s words, “I just
hate seeing rust on anything.” We took
the bracket off the old pump, Bullfrogged it too, and attached it to new pump.
 |
| Bullfrogging the pump. No rust or corrosion allowed! |
We attached the electrical lines to the new pump and turned it on
momentarily to ensure the connections were good.
 |
| Stripping the wires with Gucci stripper tool. |
Then Tom crimped and heat shrank the connectors.
 |
| Using the perfect crimping tool to crimp the connectors. |
 |
| Heat shrinking the "butt" connectors (really - their technical name) with butane torch. |
We put silicone gel on the pump inlet and outlet barbs to make
re-attaching the hoses easier. We started to reattach the outlet hose (the one with the split) and the hose started
to split again! Was it too small? This hose looked to be in terrible condition, but replacing it looked nearly impossible, i.e. there was no working room to attach a new hose to the reefer hose. Also, there was the real potential of damaging other nearby elements. What a dillema!
 |
| The small work space, I could barely get my fingers into it. The reefer hose is the dark hose leading from the bottom valve back into the boat (in the very lower right rear of the picture). |
After some discussion about which way to go, we decided that it's never a good thing to have an inferior hose serve such an important purpose, so we decided it would have to be replaced. Yep. That
took about another 2 hours to get the old hose off and the new hose on (all of 14" in long). But we finally managed to get the job done, hoses re-attached (with a quick shot of heat from the blow dryer onto the hoses), bracket put on, and pump screwed back into place.
 |
| New pump is installed. But will the reefer work? |
We turned the reefer on, the pump sounded like it was working fine, but it was still not pumping seawater! Drat, even though the pump was below the water
level, it had lost its prime. I checked the Glacier Bay Manual and in the FAQs I found, Question: "Does installing the pump below sea level insure it will get primed?" Answer: "Not necessarily." And no hints on how to prime the pump. Uh, thanks for that.
 |
| Tom and all his tools. It's put back together but will the darn thing work? |
Then Tom had a great idea. He took the hand plunger, normally used for our sinks to break the air lock, to the outlet at the back of the boat. The plunger was used to suck air/water through the system and prime the cooling pump. I turned the reefer on he reverse-plunged away until water started shooting
out the back.
Success!!!! The reefer was once again running like a champ and our cold food and drinks were safe!
Total time to replace water pump and janky hose = 4.5 hours.
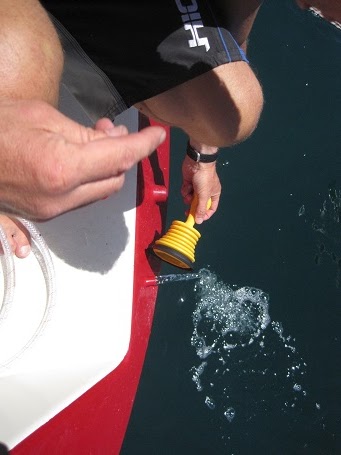 |
| Brilliant idea to prime the pump by reverse-plunging from the back. |
In comparison to what could go wrong on a refer system, this was an easy fix! Just because it took all day means nothing. 1 pump, 3 screws, 2 hose clamps, and 2 wires. That's it. However, we used 16 distinct tools and 7 specific supplies (e.g. 3/4 in hose) to effect the repair. Without those at the ready, the repair would have been delayed for who knows how long.
But, was merely REPLACING the busted pump good enough for Tom? Nooooo way. He had to find out WHY the pump broke. So he took the broken pump apart and discovered the problem was really quite simple. All that had happened was that the stainless steel spindle/axle in the pump head had corroded a little and become frozen enough so that the little vanes that pump the seawater through weren't able to spin and do their job.
 |
| Repairing the original pump - Polishing the spindle with the Dremel tool. |
So he took the pump head apart, cleaned and Dremeled the spindle and all the other parts, and put the pump back together. He hooked it up to his 12V tester and the pump seemed to work fine. So now we have a repaired spare pump as a backup.
 |
| Disassembled pump. Tom says it has a brilliantly simple, solid construction. (Magnetic drive, centrifugal action; head fully separated from the motor) |
So I guess the moral of this long-winded story is that it IS OK to have the right tools and spare parts aboard the boat, because when you need a part and you actually have it, your life will be a lot easier and more comfortable!
 |
| It's nice to have ice! And freshly frozen Wahoo and Yellowtail are a bonus. |
